Jobs
translation state of Jobs module.
The Jobs module allows to enter and manage job ads. In addition it generates a list of jobs. List of Jobs can be generated in a recruiter (Recruiter Mode) and a public search (Public Search Mode) mode
The entering process is defined at: http://www.gliffy.com/go/publish/6254781
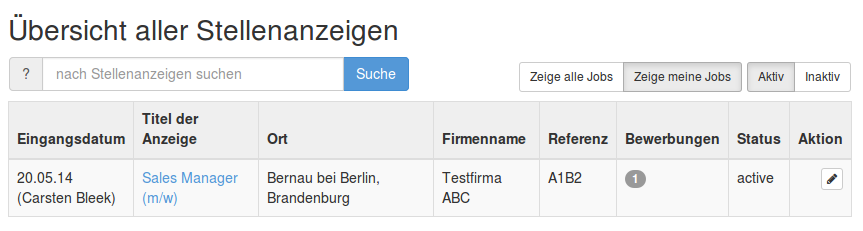
Recruiter Mode
in the recruiter mode the recruiter can see active and inactive jobs. In addition the list contains informations like number of applications (total/new) or the recruiters name, who is responsible for the position.
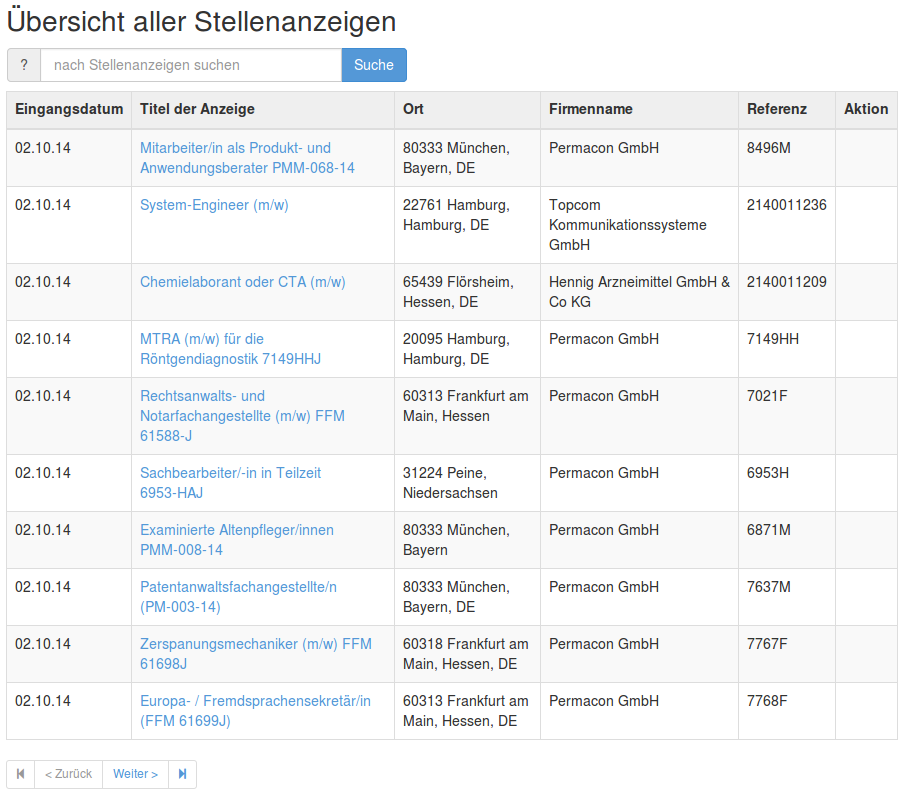
Public Search Mode
in search mode the users only see published jobs. This is normally used as a list of current vacancies, which is often used on a corporate website.
The list mode is defined by the users role.
It is also possible to configure YAWIK to run as a jobboard. There is a jobboard module which lets YAWIK act like a jobboard. This module is running on
Job Templates
you can create templates for entering job ads. All you need is an HTML version of your job opening. Simply replace the requirements, qualifications or benefits with a small piece of code. E.g.
<h4>Requirements:</h4>
<?php echo $this->requirements;?>
YAWIK replaces this code with an inline Wysiwyg HTML Editor if you want to modify your job opening. Otherwise the code is replaced by the HTML code, which was entered.
Modifications to the label fields labelBenefits, labelQualifications and
labelRequirements are applied to all jobs of company, which are using the template.
You currently can use the following placeholders:
| Name | Description |
|---|---|
| $this->benefits | Employee benefits |
| $this->city | City of the company |
| $this->description | description of the company |
| $this->descriptionEditable | editable description of the company |
| $this->jobId | ID of the job posting (since 0.29) |
| $this->qualifications | Needed qualifications |
| $this->location | Location of the job |
| $this->labelBenefits | Label of the Benefits Section |
| $this->labelQualifications | Label of the Qualifications Section |
| $this->labelRequirements | Label of the Requirements Section |
| $this->oraganizationName | Name of the company |
| $this->postalCode | postalCode of the company |
| $this->requirements | requirements of the job posting |
| $this->street | Street of the company |
| $this->title | editable title of the job posting |
| $this->headTitle | title of the job posting |
| $this->uriApply | URL a an application form |
| $this->uriJob | URL a the job posting |
| $this->uriLogo | URL of a company logo |
| $this->jobApplyButtons($this->applyData) | Apply Button |
| $this->jobApplyButtons($this->applyData) | Apply Button |
Yawik comes with the example templates “default”, “modern” and “classic”. If you want to change the Templates within your
Module, you can overwrite the template mapping adding the following configuration to your module config. Eg. you can put
a file templates.config.php into your MyModule/config directory.
<?php
return [
   'view_manager' => [
       'template_map' => [
           'templates/default/index' => __DIR__ . '/../view/yourTemplate1/index.phtml',
           'templates/modern/index' => __DIR__ . '/../view/yourTemplate2/index.phtml',
           'templates/classic/index' => __DIR__ . '/../view/yourTemplate3/index.phtml',
       ]
   ]
];
If you want to modify the selection of the templates (iframe) add the following mapping
'iframe/iFrame.phtml' => __DIR__ . '/../view/YourTemplateSelection.phtml',
Mails
you can translate mails by adding the language to the template name. example: https://github.com/cross-solution/YAWIK/tree/develop/module/Auth/view/mail
| Name | Description |
|---|---|
| mail/job-created | mail is sent to th approval team |
| mail/job-pending | mail is sent to the person, who created the job. |
| mail/job-accepted | mail informs the person, who created the job, that the job is going to be published |
| mail/job-rejected | mail informs the person, who created the job, that the job was rejected |
Options
To modify the options, copy the module.jobs.options.local.php.dist to you config/autoload directory, remove the
.dist prefix and adjust the values
| Name | type | description |
|---|---|---|
| multipostingApprovalMail | string | recipient email of the approval team |
| multipostingTargetUri | string | Send a Rest Request to this target on status changes of a job opening. The URI can
contain username/password. eg: http://user:pass@host/location?query |
| defaultLogo | string | The default Logo is shown in a job opening and in the application form |
| companyLogoMaxSize | int | Maximum size in bytes of a company Logo. Default 200kB |
| companyLogoMimeType | array | Allowed Mime-Types for company Logos |
Channel Options
The Channel Options contain information about publishing channels, a user can select to publish a job posting. To modify the
options, copy the channel.options.local.php.dist to you config/autoload directory, remove the .dist prefix and
adjust the values
| Name | type | description |
|---|---|---|
| externalKey | string | external key of a channel. Eg. a provider offers the channel “MyJobboard” with the key “123”. YAWIK provides a channel “MyJobboard” using the key “myJobborad”. Set externalKey to “123”, if the job is published to the provider. |
| prices | array | [base,list,min] You can define 3 prices which you can use in your price-calculation |
| currency | string | currency of the price. Default: CoreOptions::defaultCurrency |
| tax | int | tax rate of the channel. Default: CoreOptions::defaultTaxRate |
| label | string | label of the channel |
| publishDuration | int | number of days a job opening can be published |
| category | string | Category of the channel. Default: “General” |
| headline | string | Headline of the channel |
| description | string | Description of the channel |
| linktext | string | Linktext of a link to further information of the channel |
| linkTarget | string | Link target of a link to further information of the channel |
| route | string | Route to a content page with details about the channel |
| params | array | Parameter, which can be used for linking the detail page about the channel |
ATS Mode
The ATS (Applicant Tracking System) Mode defines, how applications should be processed. The following modes exist:
| Name | description |
|---|---|
| intern | Applications are stored within the local YAWIK instance |
| uri | Application Form is pointed to en external ATS System |
| Application Form is forwarded via Email | |
| none | The Application Formular is deactivated |
By using the ATS Mote intern, you can enable the One-Click-Apply Feature. This will add an additional Apply Button
per selected social network into the job opening.
Widget
by using the folloging Javascript Widget you can add your jobs into your personal homepage.
<script>
   (function (window, document) {
       var loader = function () {
           var script = document.createElement("script"), tag = document.getElementsByTagName("script")[0];
           script.src = "view-source:https://yawik.org/YawikWidget/yawik.min.js";
           tag.parentNode.insertBefore(script, tag);
       };
       window.addEventListener ? window.addEventListener("load", loader, false) : window.attachEvent("onload", loader);
   })(window, document);
</script>
The javascript renders a joblist inside a container with the id YawikWidget
<div id="YawikWidget"
    data-organization="55ae775c6b10f8f05b8b457f"
    data-yawik="https://yawik.org/">
</div>
The attribute data-organizations takes an organization id, provided by your used yawik. The attribute data-yawik takes the location of the used yawik.
Source Code of the Widget: https://github.com/cbleek/YawikWidget
Price Calculation
The price calculations can be overridden by creating a MyCalculation.php. You can start by coping the ChannelPrices.php to MyCalculation.php. Adjust the namespace and implement your logic within the filter function.
To use your MyCalculation.php, you have to copy the ChannelPricesFactory.php into YourModule. Adjust the namespace and the $filterClass value.
To use your filter, you have to put the following config into your modules.config.php
'filters' => [
  'factories'=> [
     'Jobs/ChannelPrices'  => 'YourModule\Factory\Filter\MyCalculation',
     ...
    ]
 ]
One-Click-Apply
Since 0.25
You can simply add an apply button to you job opening by putting the following code into your job template.
<?=$this->jobApplyButtons($this->applyData)?>
This will use the ATS Mode settings and render the button. In addition to the ATS Mode settings you can set options to the Apply buttons. These options can be used to modify the layout and the behaviour of the Apply button.
<?=$this->jobApplyButtons(
    $this->applyData,
    [
        'sendImmediately' => true,
        'oneClickOnly' => false,
        'defaultLabel' => 'Click here to apply',
        'oneClickLabel' => null
    ]
)?>
| name | value | description |
|---|---|---|
| sendImmediately | bool | true: Application is send immediately. Privacy policy are accepted by clicking on the button |
| oneClickOnly | bool | true: normal button, which refers to the form is hidden |
| defaultLabel | string or NULL | label of the normal button. |
| oneClickLabel | string or NULL | label of the OneClickApply Button |
By modifying the labels, you normally loose the translations. Feature was sponsored by http://stellenmarkt.de
XML Feeds
Since 0.28 each job channel can be exported as an XML Feed. A lot of existing jobboards does not provide an API to publish jobs. Job publishing is often done via XML Feeds. Therefore a default XML Structure is provided, which can be imported by external jobboards. The XML Structure can be easily modified and my vary between different jobboards.
Example of the default XML:
Search
the search formular contains the following fields
| name | Description |
|---|---|
| q | fulltext search |
| l | location |
| d | distance |
| c | category |
search formulars can be prefilled by using the formular field names. Example: https://yawik.org/demo/de/jobboard?d=20&l=Frankfurt+am+Main&q=bla
Will prefill the fullext field with “Bla”, The distance field with “20” and the location with “Frankfurt am Main”
The formular field for the professions has the name “c”. You can use the name with a separator prefix. Example
https://yawik.org/demo/de/jobboard?:c=it:sales will prefill categories with “it” and “sales”.